
Let’s face it; editing can make all the difference when making TikTok videos. Using colorful effects and smooth transition, you can put life even in a terribly dull video and make it stand out. That’s why learning how to edit TikTok videos is a must for all the creators.
Honestly, it’s not hard to grasp skill as TikTok has made editing quite easy for its users and has provided them with all the editing tools in their arsenal. You can add music, built-in filters, text, and you can even use slow down your video using the slow-motion option to make it look cool. But why can’t we just upload raw videos? Well, you absolutely can, but just think about it.
TikTok is a platform with over 1 billion users, and daily about 1 billion videos are viewed on it, most of them edited using TikTok’s built-in editing features. Now, if you upload a video without editing it, it would surely stand out, but not in an attractive and aesthetic way.
People would skip it in the first 2 seconds, and you won’t get any views. So, editing isn’t just something you do to make your video look good; it has become a standard now for TikTok videos to be well-edited, and you need to follow it too. That’s enough with the introduction and importance of editing on TikTok.
It’s time we come to the main point and guide you through the process of video editing on TikTok. We’ve also included some tips which you can use to improve your editing and create extraordinary content.
How to Edit TikTok Videos Before Posting?
As you might know, on TikTok, you can edit a video before uploading it but also have the option to post and then edit it later. First, we’ll see how to edit TikTok videos before posting them. Following are some creative editing ideas you can use to make your videos look aesthetic.
1. Adjust Your Camera Settings
First things first, before you start recording a video, you must have a firm grasp of TikTok’s camera settings. TikTok has features you can use and settings you can adjust to capture better videos. Let’s see how to access the camera and adjust its settings:
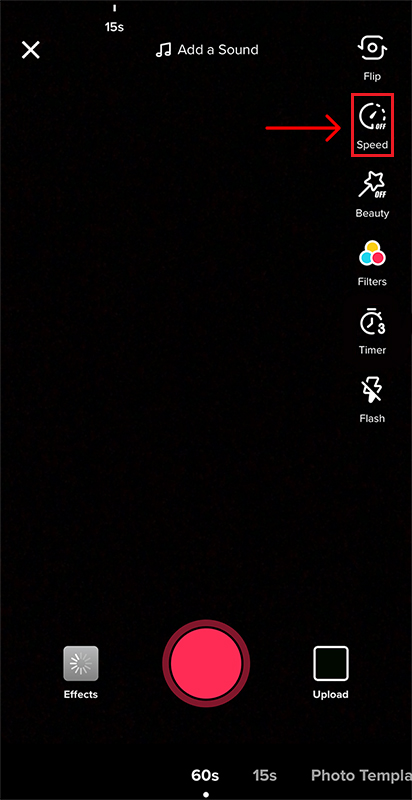
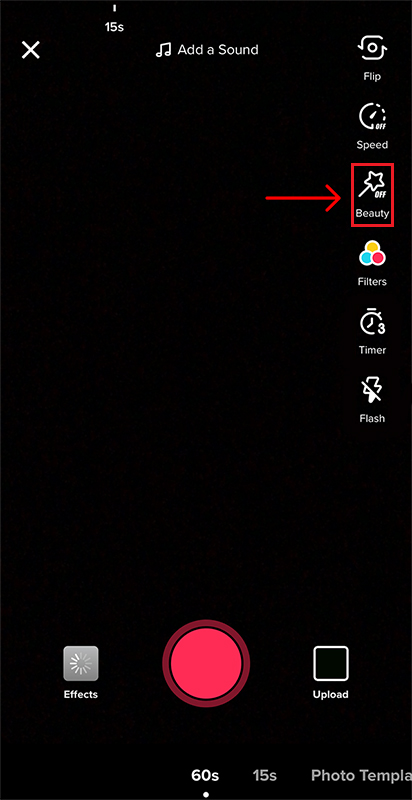
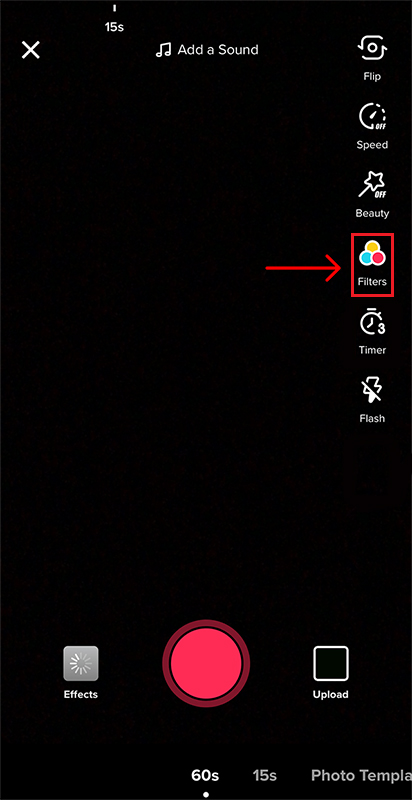
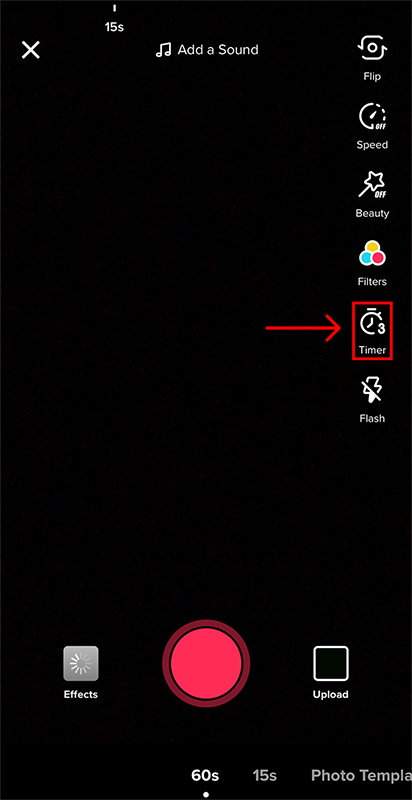
When you open your TikTok app, tap on the plus icon at the bottom center of the screen. The camera will open, and you will see all the features and settings you can access. On the top right side of the camera screen, you’ll find a list of options.
-
- You can set the speed of the video and decide whether to capture it in slow motion or normal 30 or 60 Fps.
-
- There’s a beauty mode option, which lightens your features to make your face look more photogenic.
-
- Right beneath the beauty option is the filters pallet from which you can select a filter for your video.
-
- There is also a timer that you can enable to control when the video starts recording.
-
- You can use the flash option to enable or disable the backlight.
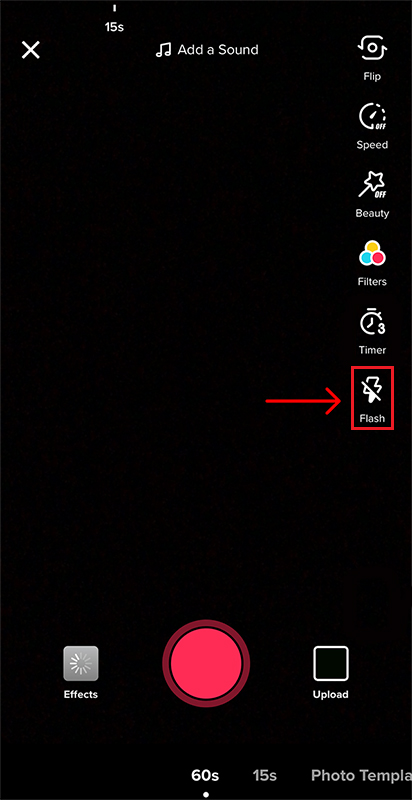
Right above the record button, there is the sounds feature that you can use to select background music for your video. Also, you can add effects to your video by tapping on the “effects” option located on the left side of the record button.
You can play around with these settings and adjust them according to your needs. But don’t make the mistake of finding one suitable setting and applying it to all your videos. Not all videos look great with the same camera settings, so adjust them according to the theme of the video.
2. Try Different Effects
TikTok has a wide range of effects available in its camera, and they are enough for all your creative needs. You can even select a picture from your gallery and use it as your video’s background. Whatever effect you can think of, TikTok has got you covered.
Want to make your clones dance with you in the video? Go ahead; there’s an effect for that already. Or do you want your video to look all hazy in an aesthetic way? Well, there’s an effect for that as well. With the special effects of TikTok, creative possibilities are limitless, so try to give all of them a shot to find which ones work for you.
3. Start Recording
Once you’re done adjusting camera settings and selecting an appropriate effect for your video, it’s time to start recording. You can choose whether you want to make a 15 seconds video or a full-length 60 seconds video so the camera can stop recording after the time limit. After selecting the time limit, tap the record button to start filming.
While recording, make sure that your camera stays stable and doesn’t move a centimeter from its place. That’s why most creators use a gimbal or camera stand for stability and better video capturing. If you want to give your video a dynamic look, you can zoom in and out by holding the record button and sliding your finger up for zoom in and down for zoom out.
To finish the recording, tap on the record button, and then you can move on to filming the next part of your video. If you’ve made a mistake in a section, tap on the delete button to remove it, and you can record it again.
4. Adjust Clips
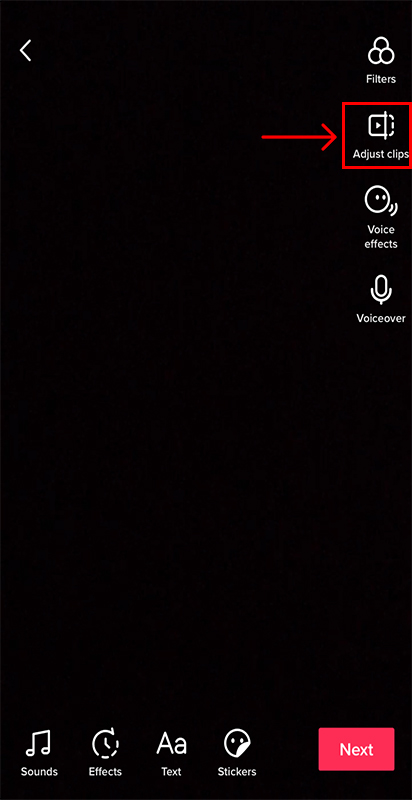
After you’ve recorded all the clips, tap on the tick icon right next to the “Record” button, and you’ll move on to the first editing screen. This is where you’ll see all your clips, and you can tap them to edit and long-press to reorder.
While editing your clips, you can add text to them, and if you don’t like them and want to redo them, simply tap on the “Start Over” option. After you finish adjusting and editing the clips, tap on the “Save” button.
5. Add Music
If you didn’t select “Background Music” for your video before recording, you could choose now. Tap on the “Sounds” button located on the bottom left corner of the video preview screen. Search for the song you want to add or browse to look for a perfect one. There are tons of songs to select from, all of them neatly categorized.
You can even pick 15 seconds and 60 seconds variations of the same music. If you like a song and plan to use it again in your future videos, you can add it to your favorites to access it easily next time. After finding the right background music, you need to adjust the volume of your video so that it doesn’t mix with the music.
You can do that by tapping on the “Volume” option and setting the volume level. Also, if you want to do a voiceover, tap on the “Microphone” on the right side of the screen to start recording audio. You can also edit your voice by tapping on the “Voice Effects” option and selecting a filter from there.
6. Add Transitions
Tap on the “Transitions” option, and a wide range of aesthetic and dynamic transitions will appear in front of you. To apply a transition on a specific part of the video, hold down the transition sphere, and lift your finger to stop.
To remove a transition, tap the “Undo” button right beneath the video’s timeline. Once you finish adding transition on clips, tap on the “Save” button located on the top right corner of the screen.
7. Add Stickers
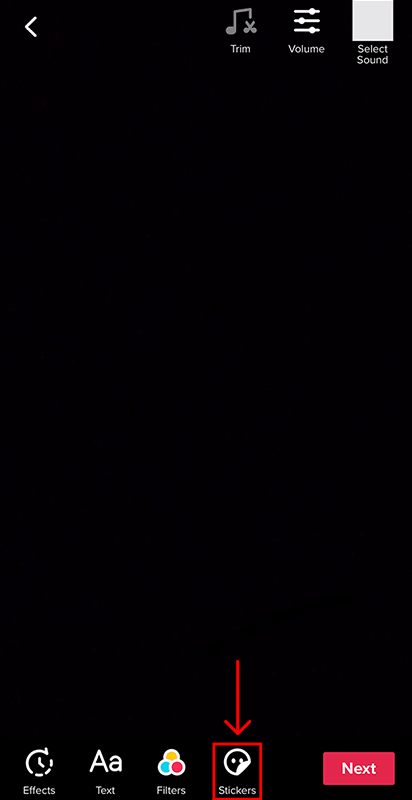
The stickers option in the editing window holds a lot of different stickers you can use to give your video a touch of creativity. You can hide a face using emoji or zoom on an object or a face by using the face zoom sticker. After adding stickers, tap on the “save” button to move on.
8. Publish it
After you’re finished editing and have saved all the changes, tap on the “Next” button to publish your video. On the post screen, you’ll be asked to fill in some information and adjust settings for your video before publishing it. First, you’ll see the words Describe your video on the left side of your video’s thumbnail.
In this section, you need to write a few words about your video and add relevant hashtags to your content. You can also @tag other accounts in this section to get their attention. Next, you’ll see the text “who can view this video.” Here you need to set the “Privacy” options for your video.
If you want to show your video to the world, set it to “Public,” or if you want to keep it to yourself, set it to “Private.” You can also set it to “Friends” so only your pals can see it. After that, you can enable or disable it if you want to allow comments on your videos.
You can also allow or disable the option for people to duet with your video or to stitch one of its sections. Moving on, enable the save to device option to save the video in your gallery. The final step is to publish the video. You can tap on the “Red Post” button to publish the video right away or tap on the “Drafts” button to save it for later.
How to Edit TikTok Videos After Posting?
Sure, you can edit TikTok videos after posting them, but you can’t do it directly. You’ll have to save the video on your device first and upload it again to apply the edit. Here’s how you can edit a TikTok video after posting:
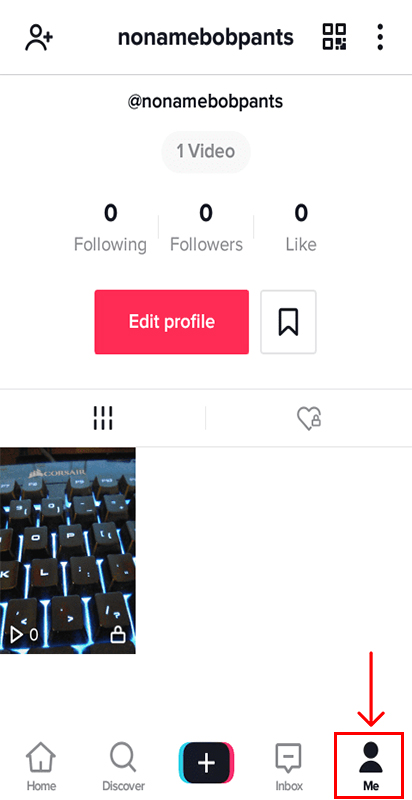
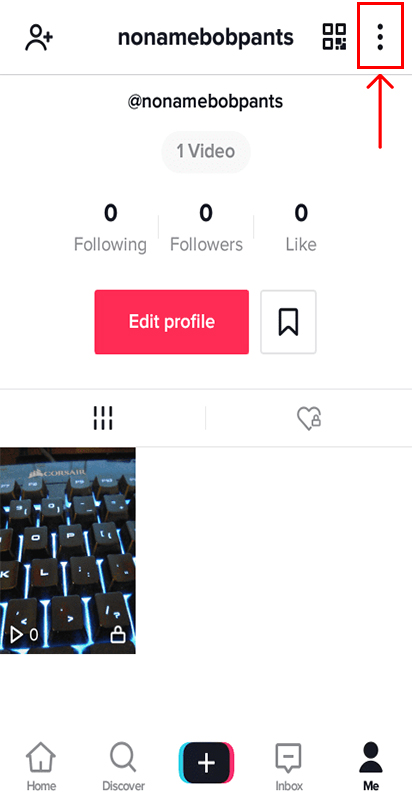
Step 1: Open your profile by tapping on the “Me” option located on the bottom right of the home screen.
Step 2: Select the video you wish to edit and open it. Once it opens, tap on the “Three Dots” appearing at the bottom of the options list on the right side of the screen.
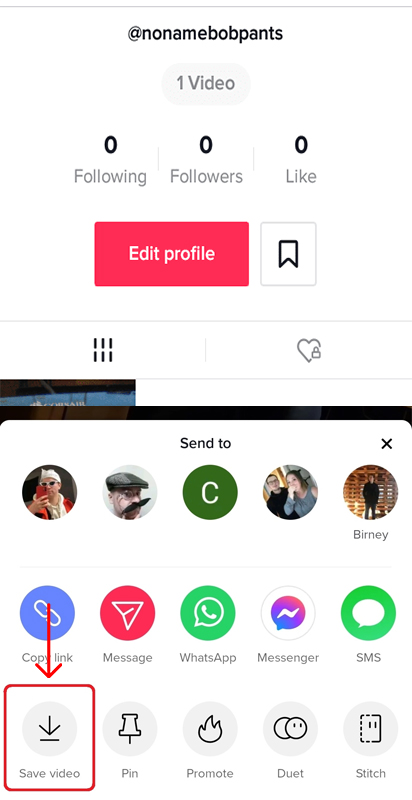
Step 3: Tap on the “Save Video” option to save it on your device.
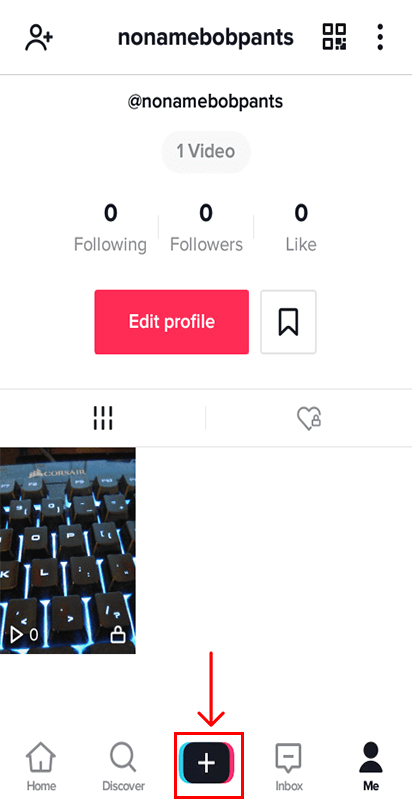
Step 4: Move back to the home screen and tap on the “Plus Icon” to create a new video.
Step 5: Once on the camera screen, tap on the “upload” option located on the right side of the record button.
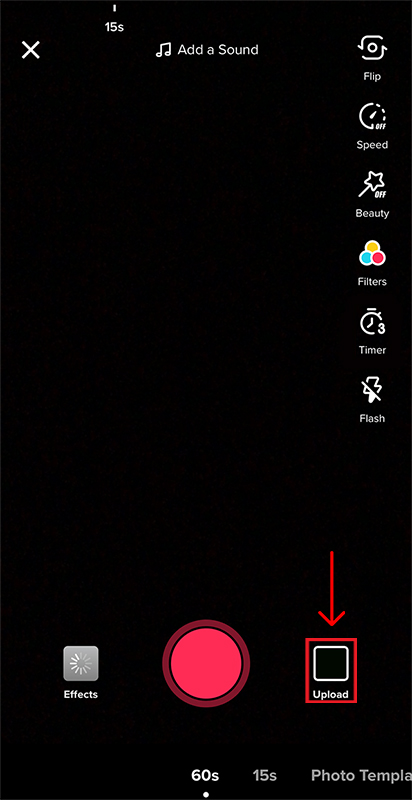
Step 6: Select the video you just saved and upload it.
Step 7: Now, go ahead and edit.
You should know that there’s not much editing you can do once a video is posted, so always try to finish your editing before posting the videos.
Conclusion
We hope you have gained a sound knowledge of editing after reading this article and grasped how to edit TikTok videos. Make sure to apply all these tips to create outclass videos and get lots of views from your audience. If you’re interested in more informative articles like this, check out our other blog posts, and who knows, you might learn something new.
Leave a Reply