Live streaming on Facebook opens up a whole world of opportunities for users to connect and engage with their audience in real-time. By going live, you can share moments, events, and discussions as they happen, whether as an individual or a brand. It creates an authentic and interactive experience.
This immediate form of communication helps increase visibility and engagement, helping you build a stronger community around your content. From increasing your reach to getting instant feedback, the benefits of live streaming on Facebook are huge!
In this article, we’ll explore step-by-step strategies to go live on Facebook, both from your mobile app and desktop and share tips to get more views.
Important Things to Know Before Going Live
Before you go live on Facebook, here are a few important things to take note of:
- To go live, you need to have access to a Facebook Page, Group, or Event where you plan to broadcast and ensure you have the necessary permissions.
- You need to give Facebook certain permissions, whether you’re using a mobile or a computer. This includes access to your camera and microphone.
- When broadcasting live audio from a Page, the streams are public by default. Adjusting the privacy settings for live audio is not an option, so plan your content accordingly.
- If you choose to broadcast from a personal profile, you can select the specific audience you wish to broadcast your live video. Options include Friends, Public, or Only Me.
- Going live as a page allows you to cross-post to more Pages. All you have to do is set up a video cross-posting relationship with the Page from your settings.
How to Go Live on Facebook in Mobile App
Going live on Facebook using the mobile app, whether iPhone or Android, allows you to share moments in real-time with your audience, wherever you are. Here’s a step-by-step guide to live streaming on Facebook from your mobile device:
Step 1: Open the Facebook app, head to the Page, Group, or personal profile, and tap on the “Live” button.
Step 2: Choose who can see your live video, be it the public, friends, or a specific viewer group.
Additional tips to give your audience the best live broadcast include flipping the camera if you wish to switch between the front and back cameras, turning on the flash for better lighting in dark environments, and adding a donation button to your live video to collect donations for a worthy cause.
Step 3: Add a compelling description to grab the attention of your audience. Tag friends, share featured links, add feelings or activities, or even check into a location.
Step 4: Experiment with various effects and themes to add a fun or professional touch to your broadcast, depending on your audience.

Step 5: Tap “Start Live Video” or “Go Live,” then the countdown to go live and engage by responding to comments, questions, and live polls in real time.
Step 6: When your live session is over, simply tap “Finish” to end your broadcast and decide whether to save, post, or delete.
Step 7: To delete, select “Delete Video.” Select “Post” to have the live video posted on your feed. You can also choose to save the video to your device.

Following these steps will help you effectively go live on Facebook using the mobile app, allowing you to connect with your audience easily.
How to Go Live with Audio on Facebook in Mobile App
To go live with audio on Facebook using the mobile app, you must first understand this feature is exclusive to qualified Pages with at least 10,000 followers. The process of starting a live audio broadcast is quite similar to going live with video; the key difference is in selecting the “Live Audio” option instead of “Live Video.”
Once you’ve chosen live audio, the subsequent steps are similar to those of a video broadcast: first, select your audience, add a compelling description, tag people or locations if desired, and then tap “Go Live.”
Live audio is a unique way to connect with your audience through voice, making it perfect for podcasts, interviews, or any situation where video isn’t necessary or preferred.
How to Go Live on Facebook on Desktop
Going live on Facebook from a desktop offers a stable and controlled environment for your live broadcasts. Here’s how to get started with live streaming on Facebook using your desktop:
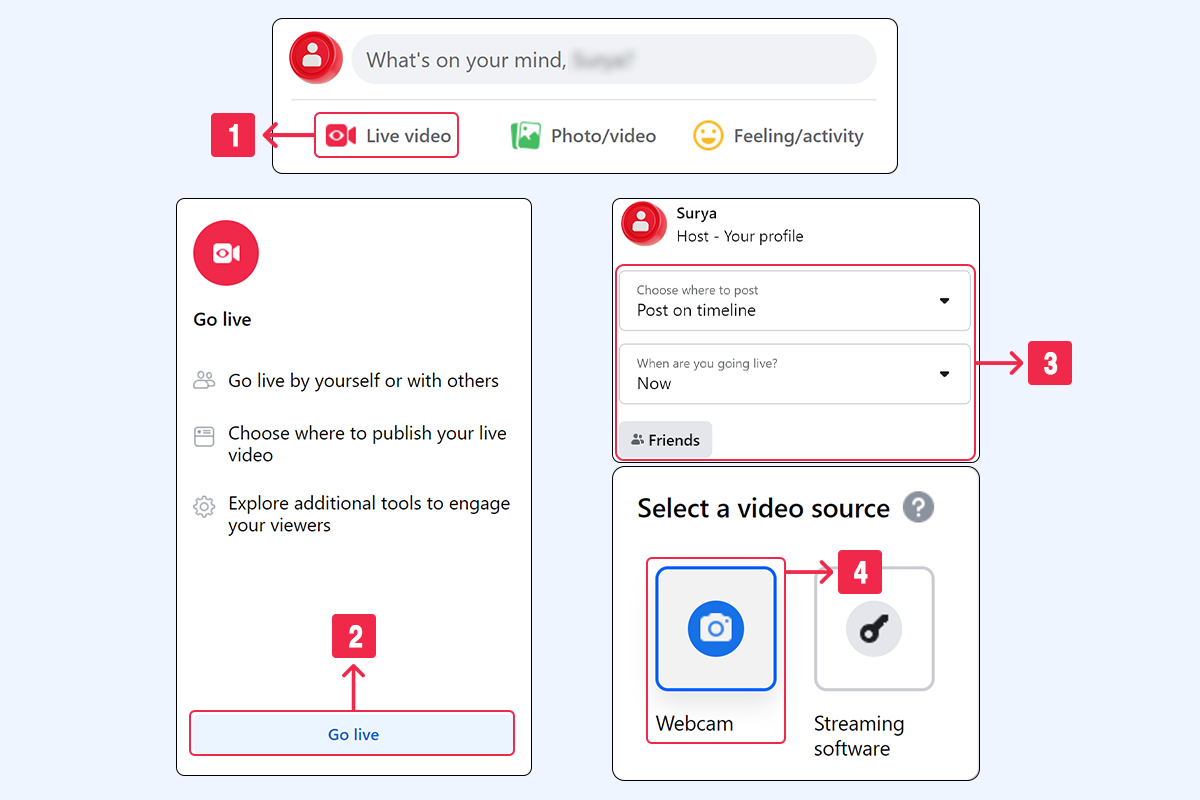
Step 1: Navigate to Facebook on your web browser and click on the “Live” button.
Step 2: You’ll be redirected to Facebook’s Live Producer, where you can click on the “Go Live” card to start setting up your broadcast.
Step 3: Choose to make your stream public, private to certain friends, or visible to a specific group that you’re a part of.
Step 4: Select “Webcam” if you plan to use your computer’s built-in camera for the live stream.
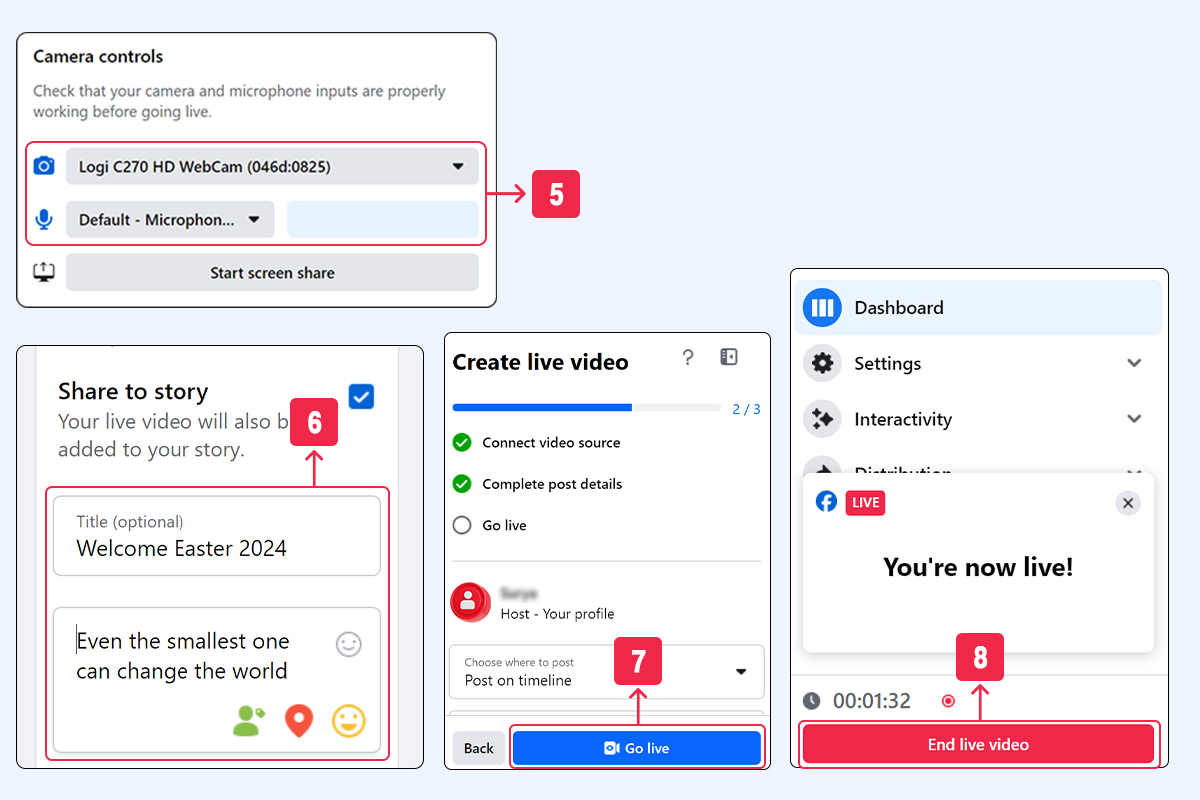
Step 5: Check your camera and microphone settings to ensure everything is working correctly, and you can even test the broadcast.
Step 6: Craft a compelling title and description for your live video and notify subscribers through Messenger rooms about your live event or share your live video on your Facebook Story.
Step 7: Click “Go Live” to start broadcasting and engage with your viewers by answering questions and acknowledging comments live.
Step 8: To conclude your live session, click “End Live Video.” You’ll then have the option to post the recorded live video to your page or delete it.
Following these steps will help you successfully go live on Facebook from your desktop, allowing you to connect with your audience through a more stable and controlled broadcasting setup.
How to Go Live on Facebook Groups
Live streaming in Facebook Groups allows you to engage directly with specific communities. Here’s a quick guide on how to start a live stream within a Facebook Group:
Step 1: Navigate to the Groups section on Facebook and select the group you wish to go live in.
Step 2: Look for the pen and paper icon or “Write something…” box, typically at the top of the group’s feed.
Step 3: Tap on the “Live Video” option and add a compelling description. You can also add any effects to enhance your video’s appearance.
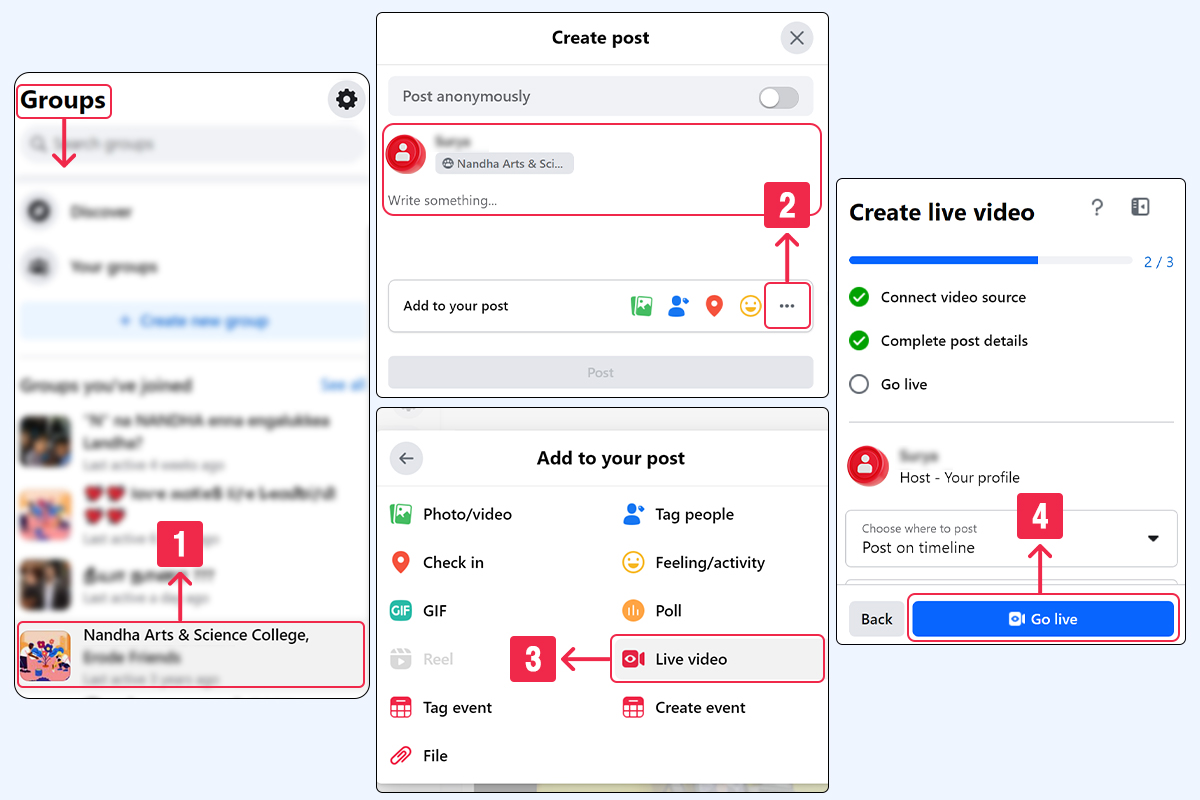
Step 4: Tap “Go Live” once you’re ready. Moderate comments and questions during the session to engage with your viewers in real time.
Following these steps, you can effectively go live within any Facebook Group you’re a part of, creating a more intimate and interactive experience with group members.
6 Tips to Boost Your Facebook Live Engagement
If you want to boost your Facebook Live engagement and go viral, here are some expert tips to guide you:
1. Create Engaging Content
The key to a successful Facebook Live broadcast is to produce content that captures the interest of your audience. It should be compelling, relevant, and tailored to the preferences of your viewers.
The Facebook algorithm tends to favor engaging content, making sure it gets the viewers’ attention and encouraging participation through comments, questions, and feedback. This boosts the overall engagement of your livestream.
2. Proper Scheduling
Choosing the right time to go live can change a lot in your engagement stats. To do this, analyze when your audience is most active on Facebook and schedule your live sessions accordingly.
You can also take advantage of the Facebook Insight tool to achieve this. Consistency in your broadcasting schedule helps build anticipation among your audience, significantly increasing the number of viewers tuning in.
3. Promotion
Effective promotion can help you attract a larger audience to your Facebook Live broadcasts. Some tactics to guide you include utilizing your Story section to tease upcoming live sessions, sharing short promotional videos that highlight what to expect from your live stream, and creating and using a unique hashtag to build buzz around your event.
4. Engage with Your Audience
Interaction is the key to improving your Facebook Live engagement. Make your viewers feel seen and heard through effective comment moderation by responding to their comments and questions during the broadcast. Address your top fans by name and encourage their input so they feel a sense of community and belonging, keeping them engaged and interested.
5. Share Across Other Social Media Platforms
Don’t limit your promotional efforts to Facebook alone. You can widen your reach by sharing announcements and highlights of your broadcast on other social media platforms like Instagram, Twitter, LinkedIn, and YouTube. Make use of emails, newsletters, and even podcasts to spread the word about your live sessions, tapping into different audience segments to get more views.
6. Collaborate with Influencers
Bringing influencers or multiple guests into your Facebook Live broadcasts can be a game-changer for your content. By co-broadcasting, you get to introduce your stream to a broader audience and add credibility through the expertise of your guests. This not only diversifies your content but also makes it more appealing to your audience, potentially leading to higher engagement levels.
Frequently Asked Questions
1. What Privacy Settings Should I Consider Before Going Live on Facebook?
Adjust privacy settings based on your audience. Choose between the public, friends, or a specific group for targeted broadcasts.
2. What Equipment Do I Need to Go Live on Facebook?
Basic requirements include a smartphone or computer with a camera and microphone. For higher quality, consider external microphones and stable internet connections.
3. Can I Save and Share My Live Video After the Broadcast Ends?
Yes, Facebook automatically saves your live video to your profile or Page, allowing you to share or post it later.
4. Are There Any Restrictions or Guidelines I Should Be Aware of Before Going Live on Facebook?
Follow Facebook’s Community Standards, avoid copyrighted content, and ensure your broadcast adheres to local laws and regulations.
5. Can I Monetize My Facebook Live Broadcasts?
Eligible creators can monetize through features like ads, fan subscriptions, and Stars. Check Facebook’s monetization policies for eligibility.
6. What Analytics and Insights Does Facebook Provide for Live Videos?
Facebook offers insights such as viewer count, engagement metrics (reactions, comments, shares), and audience demographics for live videos.
7. Is There a Time Limit for Facebook Live Broadcasts?
Facebook allows live broadcasts for up to 8 hours when streaming from a computer and 4 hours via mobile.

Leave a Reply